InstallShield Tips and Techniques

March 14, 2017

Understanding DevOps Terminolgy

Filed under: Reference Materials — shieldmaster @ 1:26 am

As my job search progresses, I find that the recruiters have little knowledge of what is involved in the DevOps revolution that is taking place in the software development shops. It’s understandable that they have very little knowledge of what these tools are, much less what each tool accomplishes in the DevOps CI/CD circle.
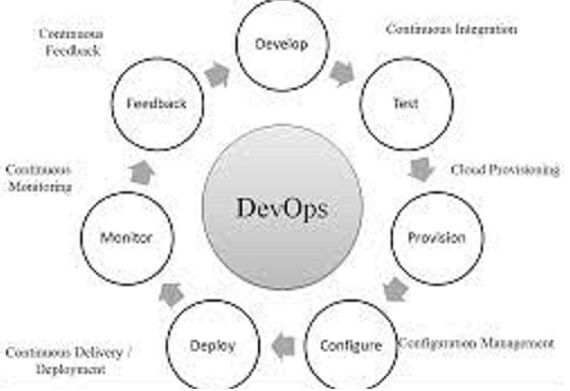


Clients are requesting prospective job applicants to have specific DevOps tools experience (Docker, Jenkins, etc.). In today’s job market it is important that the recruiter be knowledgeable in his/her understanding of the client needs and queries the client as to whether these specific tools are a “must have” or can the candidate have an equivalent knowledge in a similar tool?


In my desire to have the recruiter be as knowledgeable as possible, I am going to outline some terminology, which hopefully answers some questions – and encourages the recruiter in finding the candidate with the best fit for the opportunity.


CI/CD – An acronym that defines the process of Continuous Integration / Continuous Delivery. This focuses on constantly building the software and speeding the deployment of software fixes & enhancements to the customers servers, has driven software development shops to adopt tools that automate the process as much as possible.


DevOps – Development Operations, the close cooperation or marriage of IT network administration staff and the development group. The group was formed to closely integrate the new tools into the domain traditionally owned by IT admin group. Many of the tools are Unix/Linux based that requires a new group of personnel with skills traditionally not held in high esteem by Windows development teams.


Continuous Integration – Software process where the development team checks in code to the Source Management tool. This allows for a completion of a full build and applications are built and deployed for QA testing. Done frequently this allows for frequent testing of program interfaces and application interactions.


Using Agile processes, the team breaks down large projects into small manageable tasks, which allow for early testing by QA. This can be accomplished by either with automated testing or ramped up regression tests.


DevOps attempts to minimize the time it takes from source check-in to QA testing to a “golden hour” accros the CI/CD cycle. Obviously this attempt requires adoption of automation tools and potentially redesign of the source structure to accomplish it. No small feat!


Continuous Deployment – is a strategy for software releases wherein any code commit that passes the automated testing phase is automatically released into the production. This is accomplished by delivering every change to a production-like environment, ensuring business applications function correctly through automated testing. I hear that some large development centers employ Continuous Deployment in their shop. They also may result in misspellings that potentially could take the east coast network down…


Continuous Delivery – is a step gap towards Continuous Deployment employed by most software development shops. We recognize that every change is not necessarily deployed to the customers once it’s completed rigorous automated testing. It does mean that every change is deployable, and as a consequence is eligible for delivery to the customers as a “HotFix. Imagine never having to gear up a team for working over the weekend to get a fix in order to a customer in distress? Now imagine your normal code check-in, build, deployment process having the capability to ready an application fix in an hour!


My next discussion topic will outline the various tools that DevOps is employing, breaking them down into groups based on their similar functions.


Hope this helps. 

Charles

January 7, 2017

The Korean Conflict

Filed under: Reference Materials — shieldmaster @ 2:09 am

Once I retired from the Navy Reserves, and had more time, I have been an avid reader of military history, and have collected hundreds of books on wars and the prominent figures from WWII and the Korean Conflict. I have biographies of Admirals and Generals, political figures, as well as historical tomes on these conflicts.

For the first time ever, I am currently reading two books on the Korean Conflict simultaneously: “The Korean War – Pusan to Chosin, an Oral History” written by Donald Knox, and “In Mortal Conflict – Korea, 1950-1953” written by John Toland. Reading the dry historical perspective has been totally brought alive by alternately reading the oral histories of the soldiers and marines who experienced the action.

In June 1950, the North Korean Army crosses the 38th Parallel into South Korea. After the United Nations Security Council votes to authorize force to repel the surprise invasion, U.N., South Korean and U.S. troops establish a 150-mile-long defensive perimeter around Pusan, a port on the southeastern coast.

One of the central characters in the early weeks of the war was Captain ‘Ike’ Fenton. Captain Fenton was the Baker Company Commander of 1st Battalion, 5th Marines during the Korean War, the same unit in which his younger brother Michael served and died in during World War II.

U.S. Marines had been in Korea barely two weeks when the 27-year-old Fenton, who had fought in World War II, is plunged into a critical battle. Fenton’s company is sent into a breach in the perimeter and ordered to “hold at all cost,” lest the attacking North Koreans flank and rout the allies. “The only marines coming off that hill are dead marines,” Fenton says to his commander. Using bayonets and grenades borrowed from another company nearby, Fenton’s men hold the line

Combat Photographer David Douglas Duncan takes Captain Fenton’s picture. Duncan, a former marine, is on assignment for Life magazine. He gets as close to the action as possible, trying to show, he says, “what a man endures when his country decides to go to war.” Duncan’s photographs are among the best known of the war, and a few, including that of Fenton, are ranked among the top American combat photographs ever. The photograph captures a weary Capt. “Ike” Fenton, whose radio had just expired, being told his unit was low on ammunition, and ponders his and his unit’s fate.

Marine Captain “Ike” Fenton, USMC, Korea

Excerpted from Donald Knox’s book, is this remembrance of Captain ‘Ike’ Fenton:

“When daylight arrived, I discovered that I was the only officer left the in company. The previous afternoon the company counted 190 men and 5 officers. In the morning 88 men were left on the line. The 2nd Platoon, which had borne the brunt of the night attack, but had 11 men left.

First Lieutenant Nick Schryver from the 1st Platoon was reported to have been killed. My gunnery sergeant, Ed Wright, said he’d had been hit by a grenade burst. I thought it would be demoralizing to the men to have a dead lieutenant lying around, so even thought we were only evacuating the wounded, I told Ed, “Put Schryver on the first available stretcher and take him off the ridge”. A short time later I looked up and, gee whiz, I thought I was looking at a ghost! There stood Nick. With all the bandages wrapped around his head he looked like a mummy. “My God,” I said, “what are you doing here? They told me you were dead.” He told me, “Skipper, back in the aid station I got to thinking. The last couple of days we’ve seen a lot of action. I though your number would be up. You know, Skipper, very seldom does a young lieutenant get to command a company. Since you’re long overdue, I just figured if I could get back here, I’d get myself a company”. ”

After Pusan, Fenton sees more action in Korea and goes on to serve in Vietnam before retiring in 1970 as a much-decorated colonel. He settles in Peachtree City, Georgia, works as an executive for National Cash Register and vigorously promotes the cause of Georgia golf. He dies in 1998 at age 76, leaving two daughters, three sons, 12 grandchildren and a great-grandchild.

Captain ‘Ike’ Fenton was the oldest son of Marine Colonel Francis “Ike” Fenton, 1st Marine Division. In 1945, his father, Marine Colonel Francis “Ike” Fenton, 1st Marine Division, and his youngest brother, Pvt. Michael Fenton of Baker Company, 1st Battalion, 5th Marines, served together in combat. A photograph of the two, delayed by the war, accompanied a story in the May 31, 1945, edition of the San Diego Union. It showed the son holding his M1 rifle beside his father. The caption noted that Okinawa was the son’s first combat experience, while his father had been in the Battle of Peleliu in 1944.

The story reported that the Colonel said, “Hello, Son,” while the Private said, “Glad to see you, Sir.” They talked about mail from home. 

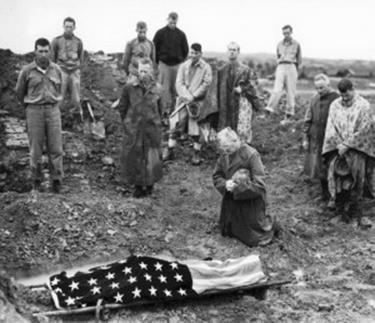
Another photograph taken not long after showed the Colonel, a helmet between his arm and body, kneeling in the dirt with his head bowed over a stretcher. A U.S. flag covered his son Michael, who was killed in action on 7 May, 1945, while fiercely repelling a vicious Japanese counterattack.

Marine Father, Marine Son


The faces of the Men in the background register the horrible sadness of the moment.

Semper Fidelis!


December 26, 2016

Installing SQL Server 2014 Express as Setup Prerequisite

Filed under: Reference Materials — shieldmaster @ 7:14 pm

I needed to create an InstallShield 2016 setup with SQL Server 2014 Express as a Setup Prerequisite. I have done this numerous times with many previous versions of SQL Server (2005, 2008, 2012) so it should have been simple.


It wasn’t!


I finally got it operational after quite a bit of effort and imagination. I am documenting the issues so that you can follow the requirements to get it operational!


Issues Encountered


I downloaded the available redistributable for SQL Server 2014 Express, and using that
executable, I created the parameters to be passed during silent execution of SQLServer 2014 Express, which can be successfully tested within a BATCH file:


 c:\Install\SQLEXPR_x86_ENU.exe /Q /ACTION=”Install” /IACCEPTSQLSERVERLICENSETERMS=”True” /UpdateEnabled=”True” /FEATURES=SQLENGINE,REPLICATION,SSMS,SNAC_SDK /INSTANCENAME=”ShieldMaster” /SECURITYMODE=”SQL” /SQLSVCACCOUNT=”NT AUTHORITY\NETWORK SERVICE” /SQLSVCSTARTUPTYPE=”AUTOMATIC” /SAPWD=”kc7000″ /SQLSYSADMINACCOUNTS=”BUILTIN\ADMINISTRATORS” /TCPENABLED=”1″ /NPENABLED=”1″


Then I injected them into the launch parameters for the PRQ files, as shown here:


I downloaded the available redistributable for SQL Server 2014 Express, and proceeded to test its installation as normal. When I initially tested on a Win 10 (64bit), it displayed both the 32bit and 64 bit versions of SQL Server 2014 Express attempting to install – indicating the 32bit had incorrect OS conditions. I fixed the 32bit PRQ to stop it installing on any Win10 operating system and corrected it just install on 32bit systems.


Well, as soon as I was able to install it, I encountered a strange error, as shown in the extract from the “SystemConfigurationCheck_Report” :


MediaPathLength

Checks whether the SQL Server installation media is too long.

Failed

SQL Server installation media on a network share or in a custom folder can cause installation failure if the total length of the path exceeds 260 characters. To correct this issue, utilize Net Use functionality or shorten the path name to the SQL Server setup.exe file.


On a hunch, I took that the 2016 InstallShield ISM and unchecked SQL Server 2014 and checked SQL Server 2012 Express. I added the silent parameters from the SQL Server 2014 PRQ, and rebuilt the setup.  


It work perfectly!!!   It looks like the issue resides with how the Setup Prerequisite has been created.  I opened an incident with InstallShield support and received this email answer:


This is actually due to a change in recent SQL installers. Previously, the SQL installer did not extract its files to the location where the setup is located. Now that it does, it will result in the issue where the path is too long causing this issue during silent SQL installs.


The workaround that you can do is to create a batch file like so:

@echo off


cmd /C start /wait SQLEXPR_x64_ENU.exe /qs /x:”C:\temp\SQLTEMP”


C:\temp\SQLTEMP\setup.exe /qs /ACTION=install etc etc etc


And then include that batch file in the prerequisite and set the Application to Run as the batch file instead. This way, the prerequisite will launch the batch file instead of the SQL installer directly and will do the above to extract the files to the custom location as specified by /x and then launch that extracted setup.


During my testing, I had noticed that the extracted Setup.exe was embedded deep within the %TEMP% folder, such as “C:\Users\Charles\AppData\Local\Temp\{00B5C96B-7A86-4762-8FF8-C789F53FC1E2}\02CB69A4-ABE6-4ED3-8601-05A0651AACA0”, so now I had a solution.

To compound the issue, the client wanted SQL Server Express 2014 with Tools – which expanded the setup from 279MB to 890MB just for 64bit. I could not set the parameter to extract the Setup Prerequisites from the setup – I needed to have the pulled from the web.

The problem is that when I created the LAUNCH.BAT, and staged it with the file “SQLEXPR_x64_ENU.exe”, and tried to have them downloaded from the web, the two files would not match up correctly.

My solution was to use an old InstallShield tool “PackageForTheWeb” (PFTW) to create a self-extracting executable – which will launch the file “Launch.BAT” upon extraction. This solution kept the two files together so the command file could find the SQL Server executable.

Then the customer wanted to have the SQL Server installed only if they indicated, so I put a customer dialog in which the customer dictated whether the Database Schema was to be installed into a new Express instance, or into an existing SQL Server database instance. (If they choose the latter, I would display the SQLLogin screen). Thus if they wanted to install into a new Express instance, I would trigger the Setup Prerequisite to install as a Feature prerequisite – as shown here:


Solution


So, here is the step by step solution:

Step #1


  • Create a batch file containing the following information – in this case it’s for the 32bit version:


Step #2


  • Stage the batch file in the same directory as the SQL Server 2014 express executable


Step #3


  • Now, I used PFTW to create a self-extracting executable – called it “SQLServer2014Express_86_WT.exe”. This file I moved into the InstallShield directory where the Setup Prerequisites are stored. This directory is:

    C:\Program Files (x86)\InstallShield\2016\SetupPrerequisites\SQLServerExpress\2014\x86

Step #4


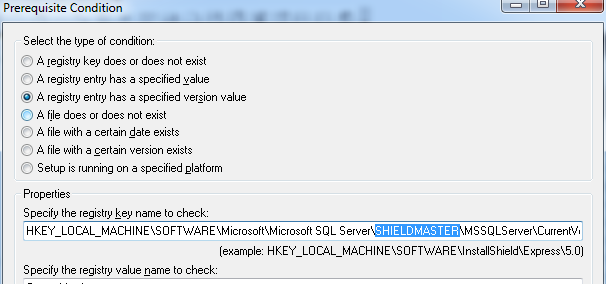
  • Now I updated the PRQ file to point at this new executable “SQLServer2014Express_86_WT.exe”. I loaded this executable to my website, and modified the Files URL to point to this across the web. I also modified the condition to enable the new Instance to be evaluated “ShieldMaster”.


Finally a working solution!


Hope this helps!


ShieldMaster


May 26, 2016

Memorial Day 2016

Filed under: Reference Materials — shieldmaster @ 10:30 pm

One of most haunting books on Europe’s D-Day is the story of the men from Bedford County, Virginia that went to war as single company as told in the book “Bedford Goes To War”, by James W. Morrison. Their company was selected to be the 1st line of landing craft that landed on Omaha Beach on June 6th, 1994. Tragedy struck when 20 men from Buford Country died that day on the beach, but the families did not receive official notification until mid-July.

One poignant story recounted in that book was a letter written by a soldier who landed on Omaha Beach on D-Day plus 1, and found a plastic wrapped bible on the shore. He wrote this letter, dated July 9, 1944, to the family of the man who name was inside of the bible:

Dear Mr. and Mrs Hoback:


While walking along the beach D-Day plus 1, I came upon this Bible. Knowing that you no doubt would want the book returned,

I am sending it knowing that most Bibles are a book to be cherished. I would have sent it sooner, but have been quite busy and

thought it best if a short period of time elapsed before returning it.


You have by now received a letter from your son saying he is well. I sincerely hope so. I imagine what has happened is that

your son dropped the book without any notice. Most everybody who landed on the beach D-Day lost something.


The beach is now peaceful and quite since the German guns have been silenced. The bird have begun their daily practice and all the flowers and trees are in bloom,

especially the poppies and tulips which are very beautiful this time of the year.


With best wishes,

Private H.W. Crayton.

Mrs. John Hoback, whose sons Buford and Raymond were both killed on D-Day in France, had the letter published in the Bedford Bulletin.


Remembering Memorial Day, 2016

Charles B. Hodge
Commander, USNR-Retired

May 24, 2016

InstallShield Training Course

Filed under: Reference Materials — shieldmaster @ 11:00 pm

Recently we were asked to deliver some online training on InstallShield to some relatively new InstallShield developers.  Actually these were developers who were tasked to develop an installation program using InstallShield – which happens quite a bit due to turnover, etc..

We have considerable experience in developing applications in InstallShield – numbering in the hundreds, so it was easy to create an outline for these new students.  It was taught one-on-one using GoToMeeting, and the training was recorded which allowed the student to review any/all of the material later.  Flexible enough it was given in 4 hour increments – once per day to allow for meeting business requirements.

Here is the course outline that we gave.  If you are interested contact Mike Hodge at 770.309.6581 – or email at mike@InstallSolutionsInc.com

InstallShield training:

  • Session 1 – 4.0 hours
    • General overview of 3 InstallShield projects
    • Detailed review of InstallShield Development environment (IDE)
    • Review of File Organization
      • Defining Features
      • Working with features and components
      • Static file linking
      • Dynamic file linking
      • Working with destination folders
      • Best Practice Fundamentals
      • “Key” Resource Usage
      • GUID Usage
      • Creating shortcuts
  • Understanding User Interface and Execution Sequence


  • Session 2 – 4.0 hours

This session focusing understanding and manipulating the Dialogs

  • How MSI determines dialog order and conditions
  • Working with control events
  • Working with control conditions
  • Required dialog boxes
  • Altering dialog sequence
  • Creating new dialog boxes


  • Session 3 – 4.0 hours

This session will focus on making System changes to the user’s Operating System, such as configuring user data:

  • Registry data
  • Importing .REG files
  • Altering via fixed values
  • Altering via MSI Property values
  • Altering via Custom Actions
  • INI files
  • XML files
  • Environment variables
  • File associations


Then we focus on handling special files

  • MSI Properties
  • Microsoft Redistributables
  • NT Windows services
  • Fonts
  • .NET Assemblies
  • Create IIS Websites
  • Setup Prerequisites


  • Session 4 – 4.0 hours

This section will present an overview of the usage of InstallShield proprietary InstallScript language.

  • Log entries to MSI Log
  • Access (Ready/Write Registry values)
  • Query Operating System State
  • Configure application data


In this section, you will learn how to run an installation from Windows Explorer or from the command prompt, how to perform silent and limited-user interface installations and how to pass information to the running installation from the command line:

  • Running an installation
  • Maintenance and uninstallation
  • Using msiexec.exe
  • Silent and reduced-UI installations
  • Passing properties from the command line


Finally, we discuss how Windows Installer supports different types of updates and different techniques for packaging them for distribution. In this section, you will learn about:

  • Types of updates
  • Understanding a minor upgrade
  • Understanding a major upgrades
  • Upgrade testing issues
  • General patch overview
  • InstallShield Update Service


Where is ShieldMaster?

Filed under: Reference Materials — shieldmaster @ 10:33 pm

There has been a lack of posting lately on this Blog.  Essentially it’s been medical issues – my doctor found that I had a lump in my breast and after biopsy it was found to be Breast Cancer.  My oncologist has treated over 8,000 women for BC and I am his 4th guy!  Just my luck.

Chemo is finished and on the last 5 radiation treatments.

Been a long struggle, but I am making it!

ShieldMaster

October 26, 2015

How to make shortcuts RunAsAdministrator and run in Compatibility Mode

Filed under: Reference Materials — shieldmaster @ 11:36 pm


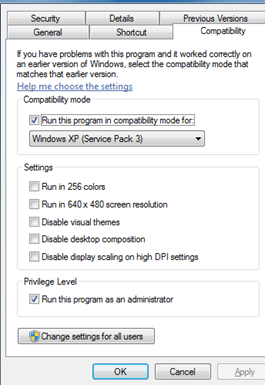
I had a client request that their application shortcuts to be enabled to have the checkbox “Run this program as an Administrator” and also to have the checkbox for “Run this program in Compatibility mode for WinXP” – as shown here:

I started doing research and found out that all roads were pointing towards having a Manifest XML document created for each application executable. Well, that seemed like it was going to be too much work… So I setup a test VM machine, and altered the shortcut properties. I exported the HKCU and HKLM registry hives before and after the change, and found out that an entry in the HKCU registry hive was made when I altered the shortcut. My example shows the WinXP SP3 compatability setting – but if you modify a shortcut for Windows 7 – you can observe another registry change. The value “WINXPSP3” changes to “WIN7RTM”.

Note: For WinXP Operating Systems (yes Virginia, they are still out there…), the compatibility setting is “WIN2000“.


[HKEY_CURRENT_USER\Software\Microsoft\Windows NT\CurrentVersion\AppCompatFlags\Layers]

“c:\Program Files (x86)\SQLFinancials\SQLAP\SQLAP.exe”=”WINXPSP3 RUNADMIN”

Since it elevate the actual application executable, the elevation works for both desktop shortcuts as well as Program shortcuts. Obviously this will work for just the user that installed the software, but it solves the problem for 99% of my client’s needs.

ShieldMaster

InstallShield Issue when importing Dialog into Basic MSI Projects

Filed under: Reference Materials — shieldmaster @ 7:05 pm


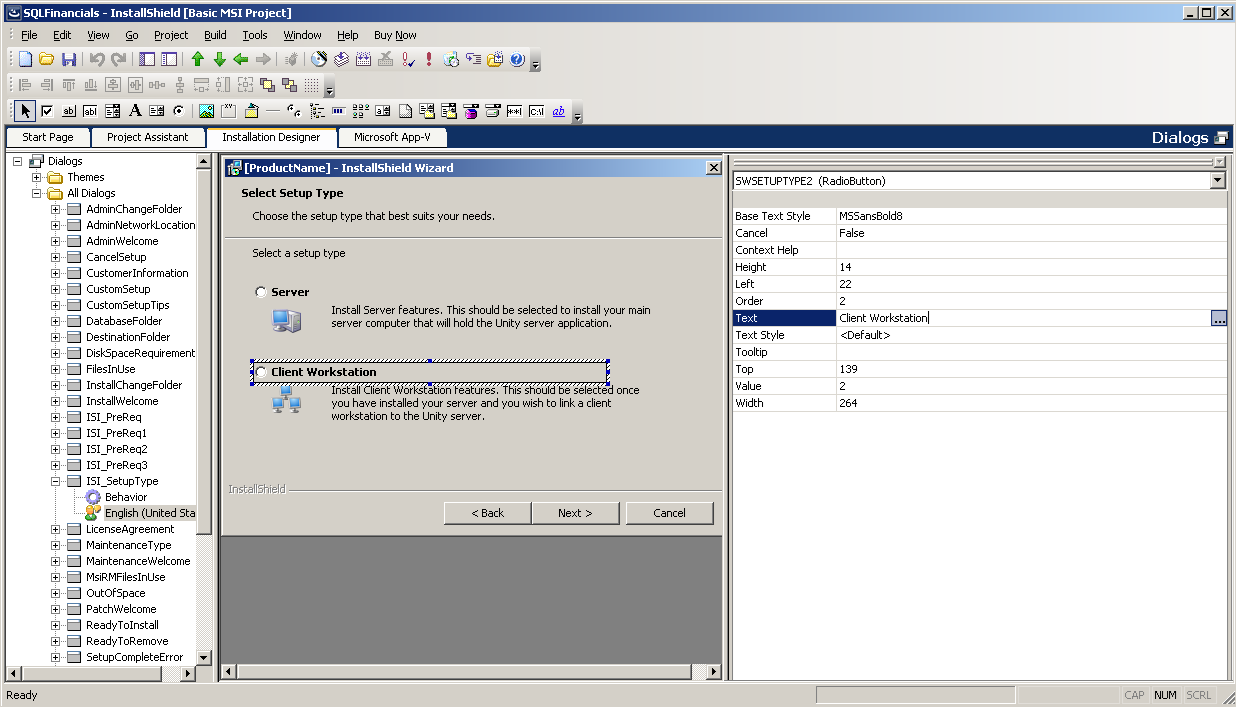
I was working on a project recently that required me to replicate one of the dialogs from one project to another – in this case a dialog with a radio selection – to let the client indicate if a Server or Workstation installation was desired. Instead of recreating the dialog, I chose the option to “Export” the dialog from one project to the target project. After the export and cleanup – my installation encountered a strange abort, which occurred after the dialogs were displayed when I selected INSTALL on the “Ready To Install” dialog – the installation activity disappeared!!! No dialogs appeared, just the dead Setup/MsiExec processes running.


It took a week of sleuthing to uncover the problem. A WEEK of 3-4 hours each night trying to determine the problem! Finally I realized that the String table contained incorrect checksums! I had modified the string table entry while the project was not open in InstallShield but kept the checksum value the same. Apparently InstallShield does not check the String Table integrity when you open/close the project. Consequently during execution, the incorrect String Table values caused the install to abort.


To clarify, I am going to step thru the correct process to Export/Import a dialog – and show you what I did wrong!


Exporting the Dialog

Here is the dialog I wanted to export/import – notice the icons representing the Server/Client workstation:


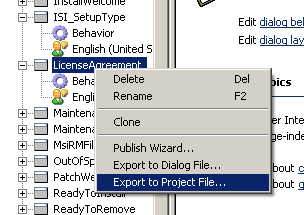
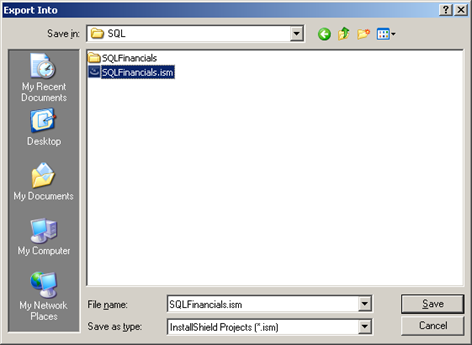
To start the process – I right-clicked the dialog and chose “Export to Project File…” – as shown here:


Now, navigate to the InstallShield project you want to import the dialog – (Hint: it must not be open in InstallShield – if so it will be locked and you can’t import the dialog)..


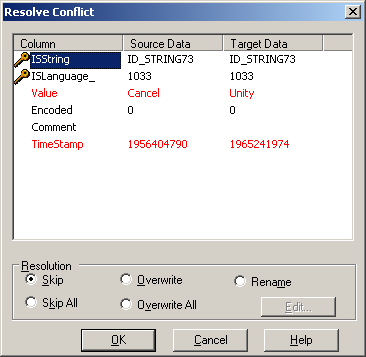
Immediately you will see String Tables being shown as conflicting values – in this case I can’t correct them since they are not “Key” values – so I must Overwrite and resolve them later. Here are a couple of conflicts:


Resolving Icon Issues


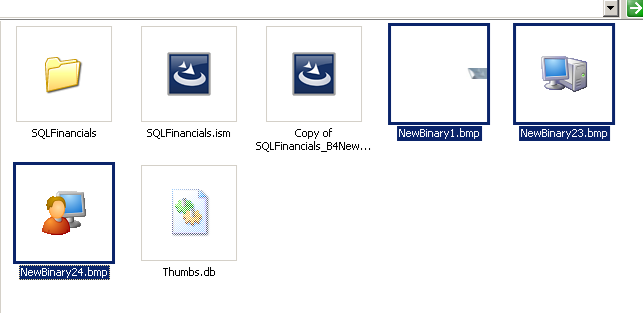
The first thing you will notice will be some new files (NewBinary1,etc) in the ISM directory – they are misplaced Icons that are imported from the orginal dialog – in this case the Dialog Banner, and Client/Server icons.


To demonstrate – rename the files with BMP extension and view them as Icons:


Now open the SQLFinancials project that you exported the dialog into – and display the new dialog “ISI_SetupType”


Highlight the Server icon – and you will see it pointing to that NewBinary file. Now correctly point it to the existing icon in your directory, as shown here:


Now correctly point the other two icons to their icon in your directory to resolve this issue, now you can delete the NewBinary files.


Resolving String Table Issues


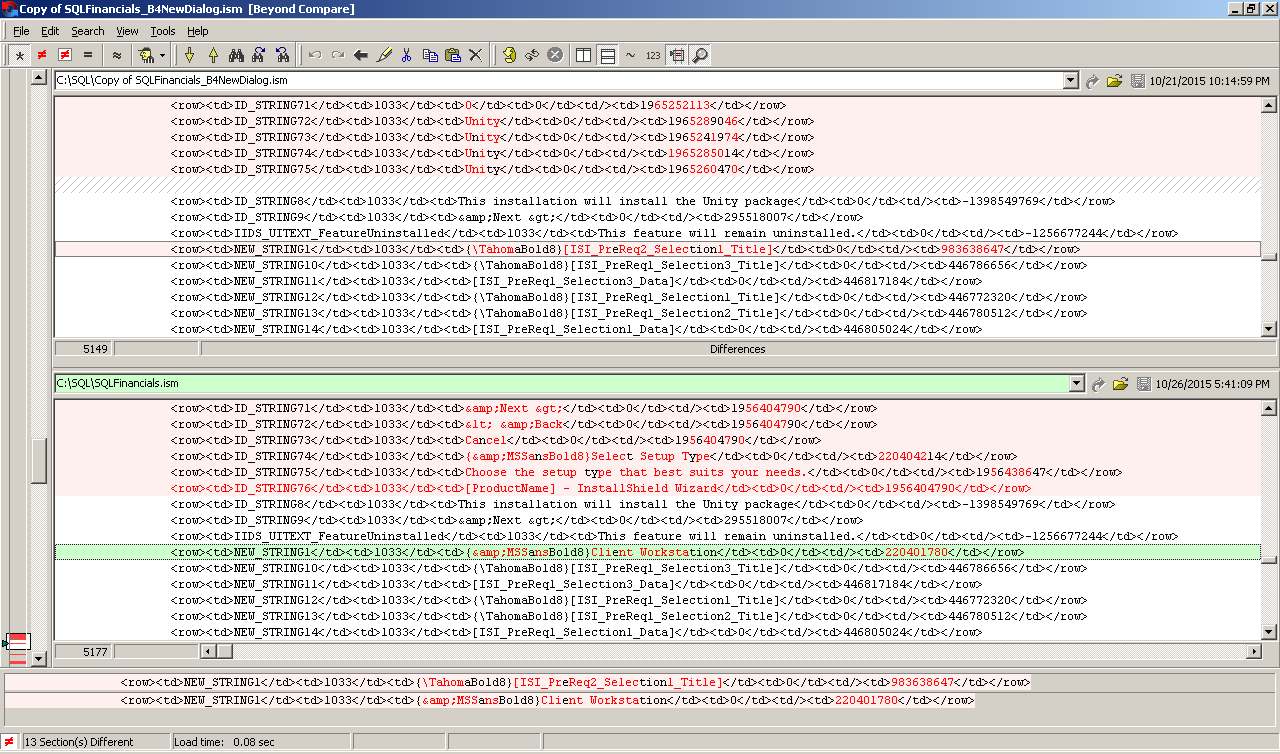
The string table now has entries that overwrote existing table entries, as pointed out during the conflict dialogs during exporting – I can see this by using a tool like “BeyondCompare” to view the Before/After images of the SQLFinancials.ISM project (both projects must be saved in XML format).


As you can see, I have the before image (“Copy of SQLFinancials_B4NewDialog.ISM” on the top panel and the modified “SQLFinancials.ISM” on the bottom panel. Notice that “NewString1” has been overlayed with different sting values – and the checksum is different to match the new values. The same situation exists for entries “ID_STRING71” thru “ID_STRING75”.


The proper method to resolve this issue is to open the SQLFinancials project within InstallShield and follow these steps for each String table entry:

  1. Go to the new Dialog – and select the string entry “Client Workstation” and select the three dots […] to the right side of the Text entry. This opens the String Table to “NEW_STRING1”


  1. Copy the entry found there “{&MSSansBold8}Client Workstation”
  2. Press the + button to create a new String table – and paste that value in the field – as shown here:
  3. Repeat for each of the string table entries that were overwritten during the import of the dialog.


  1. Now Save the project in InstallShield. To put the NewSTRING1 back to the original value – you can navigate to the String Table within InstallShield and copy the values from the original project. I do it quicker by closing the InstallShield project and using BeyondCompare – as noted here:
    1. Open the before/after projects in BeyondCompare – and COPY each string table that was modified from the Before image to the After image. You want to ensure the entry for NEW_STRING1 in the before image is exactly like the entry in the String Table of the After project. Copy the entire line – which includes the checksum value.


Don’t manipulate the String Table outside of InstallShield


Now you have correctly put the String table back in sync, please don’t do what I did which caused the abort during execution. What I did was to use the BeyondCompare tool – and I copied the string value “{TahomaBold8}[ISI+PreReq2_Selection1_Title]” from the Before ISM to the After ISM for entry “NEW_STRING1”. I did not copy the corresponding checksum – this was my mistake. BAD BAD BAD L


Hopefully this helps you in your project development!


ShieldMaster

InstallShield Issue when importing Dialog into Basic MSI Projects

Filed under: Reference Materials — shieldmaster @ 6:57 pm


I was working on a project recently that required me to replicate one of the dialogs from one project to another – in this case a dialog with a radio selection – to let the client indicate if a Server or Workstation installation was desired. Instead of recreating the dialog, I chose the option to “Export” the dialog from one project to the target project. After the export and cleanup – my installation encountered a strange abort, after the dialogs were displayed and I selected INSTALL on the “Ready To Install” dialog the installation activity disappeared!!! No dialogs appeared, just the dead Setup/MsiExec processes running.


It took a week of sleuthing to uncover the problem. A WEEK of 3-4 hours each night trying to determine the problem! Finally I realized that the String table contained incorrect checksums! I had modified the string table entry while the project was not open in InstallShield but kept the checksum value the same. Apparently InstallShield does not check the String Table integrity when you open/close the project. Consequently during execution, the incorrect String Table values caused the install to abort.


To clarify, I am going to step thru the correct process to Export/Import a dialog – and show you what I did wrong!


Exporting the Dialog

Here is the dialog I wanted to export/import – notice the icons representing the Server/Client workstation:


To start the process – I right-clicked the dialog and chose “Export to Project File…” – as shown here:


Now, navigate to the InstallShield project you want to import the dialog – (Hint: it must not be open in InstallShield – if so it will be locked and you can’t import the dialog)..


Immediately you will see String Tables being shown as conflicting values – in this case I can’t correct them since they are not “Key” values – so I must Overwrite and resolve them later. Here are a couple of conflicts:


Resolving Icon Issues


The first thing you will notice will be some new files (NewBinary1,etc) in the ISM directory – they are misplaced Icons that are imported from the orginal dialog – in this case the Dialog Banner, and Client/Server icons.


To demonstrate – rename the files with BMP extension and view them as Icons:


Now open the SQLFinancials project that you exported the dialog into – and display the new dialog “ISI_SetupType”


Highlight the Server icon – and you will set it pointing to that NewBinary file. Now correctly point it to the existing icon in your directory, as shown here:


Now correctly point the other two icons to their icon in your directory to resolve this issue, then you can delete the NewBinary files.


Resolving String Table Issues


The string table now has entries that overwrote existing table entries – I can see this by using a tool like “BeyondCompare” to view the Before/After images of the SQLFinancials.ISM project (saved in XML format).


As you can see, I have the before image (Copy of SQLFinancials_B4NewDialog.ISM” on the top panel and the modified SQLFinancials.ISM on the bottom panel. Notice that “NewString1” has been overlayed with different sting values – and the checksum is different to match the new values. The same situation exists for entries “ID_STRING71” thru “ID_STRING75”.


The proper method to resolve this issue is to open the SQLFinancials project within InstallShield and follow these steps for each String table entry:

  1. Go to the new Dialog – and select the string entry “Client Workstation” and select the three dots […] to the right side of the Text entry. This opens the String Table to “NEW_STRING1”


  1. Copy the entry found there “{&MSSansBold8}Client Workstation”
  2. Press the + button to create a new String table – and paste that value in the field – as shown here:
  3. Repeat for each of the string table entries that were overwritten during the import of the dialog.


  1. Now Save the project in InstallShield.
  2. Open the before/after projects in BeyondCompare – and COPY each string table that was modified from the Before image to the After image. You want to ensure the entry for NEW_STRING1 in the before image is exactly like the entry in the String Table of the After project. Copy the entire line – which includes the checksum value.


Don’t manipulate the String Table outside of InstallShield


Now you have correctly put the String table back in sync, please don’t do what I did which caused the abort during execution. What I did was to use the BeyondCompare tool – and I copied the string value “{TahomaBold8}[ISI+PreReq2_Selection1_Title]” from the Before ISM to the After ISM for entry “NEW_STRING1”. I did not copy the corresponding checksum – this was my mistake. BAD BAD BAD L


Hopefully this helps you in your project development!


ShieldMaster

October 17, 2015

Determining Windows Operating System with WindowsBuild

Filed under: Reference Materials — shieldmaster @ 2:09 pm

With new Windows 10 Operating System, when you use a version of InstallShield older than version 2015 – you won’t be able to use the pre-defined constants. Here is the table that allows you to use WindowsBuild for InstallScript evaluation or conditional statements.


Windows Operating System

WindowsBuild value

Windows 2000

2195

Windows XP

2600

Windows XP Professional x64

3790

Windows Server 2003

3790

Windows Server 2003 R2

3790

Windows Vista

6000, 6001 (SP1), 6002 (SP2)

Windows Server 2008

6000

Windows Server 2008 SP1

6001 (SP1)

Windows Server 2008 SP2

6002 (SP2)

Windows 7

7600, 7601 (SP1)

Windows Server 2008 R2

7600, 7601 (SP1)

Windows 8

9200

Windows Server 2012

9200

Windows 8.1

9600

Windows Server 2012 R2

9600

Windows 10

(various, starting around 9400)

Older Posts »

Create a free website or blog at WordPress.com.